Monday, May 12, 2014

Java Asynchronous NIO File Reading Example

If you want to read a file using Java AsynchronousFileChannel, following sample code might help you to get started.
package com.ruchira.samples;

import java.io.IOException;
import java.nio.ByteBuffer;
import java.nio.channels.AsynchronousFileChannel;
import java.nio.channels.CompletionHandler;
import java.nio.file.Path;
import java.nio.file.Paths;
import java.util.concurrent.ExecutionException;
import java.util.concurrent.Future;

public class AsyncReader {
    public static void main(String[] args) throws
            IOException, InterruptedException, ExecutionException {
        String fileName = "/Users/ruchira/Downloads/README.md";
        completionHandler(fileName);
        future(fileName);
    }

    private static void completionHandler(String fileName)
            throws InterruptedException, IOException, ExecutionException {
        final Thread current = Thread.currentThread();
        final StringBuilder content = new StringBuilder();
        Path path = Paths.get(fileName);
        final AsynchronousFileChannel ch = AsynchronousFileChannel.open(path);
        final ByteBuffer buf = ByteBuffer.allocate(1024);
        ch.read(buf, 0, 0,
                new CompletionHandler() {
                    public void completed(Integer result, Integer length) {
                        if (result == -1) {
                            try {
                                ch.close();
                            } catch (IOException e) {
                                //ignored
                            }
                            current.interrupt();
                            return;
                        }
                        buf.flip();
                        content.append(new String(buf.array()));
                        /*while (buf.hasRemaining()) {
                            content.append((char) buf.get());
                        }*/
                        buf.clear();
                        ch.read(buf, length, length + result, this);
                    }
                    
                    public void failed(Throwable exc, Integer length) {
                        System.out.println("Failure: " + exc.toString());
                    }
                }
        );

        System.out.println("You can use this thread for another task");
        try {
            current.join();
        } catch (InterruptedException e) {
            //ignored
        }
        System.out.println(content);
    }

    private static void future(String fileName)
            throws InterruptedException, IOException, ExecutionException {
        StringBuilder content = new StringBuilder();

        int start = 0;
        Path path = Paths.get(fileName);
        AsynchronousFileChannel ch = AsynchronousFileChannel.open(path);
        ByteBuffer buf = ByteBuffer.allocate(1024);
        Future result = ch.read(buf, start);
        int length;
        while ((length = result.get()) != -1) {
            while (!result.isDone()) {
                System.out.println("You can use this thread for another task");
                Thread.sleep(100);
            }
            buf.flip();
            content.append(new String(buf.array()));
            /*while (buf.hasRemaining()) {
                content.append((char) buf.get());
            }*/
            buf.clear();
            result = ch.read(buf, start);
            start += length;
        }
        ch.close();
        System.out.println(content);
    }
}

Sunday, March 16, 2014

Generate MD5 Sum of Multiple Files

If you want to get the MD5 sum of multiple files at once, following command can be used. This could be useful when you want to compare two set of directories/products to see the difference between them.

i.e.  You can create jarsums1.txt, jarsums2.txt and check the difference using diff command.
find . -iname "*.jar" | sort | xargs md5sum > jarsums.txt

Thursday, February 27, 2014

Pub-Sub with WSO2 User Engagement Server

If you are writing any custom dashboards with WSO2 UES which requires inter-gadget communication or dashboard-gadgets communications, then you may find following codes helpful.
  1. Create a Jaggery app named pubsub-dashboard.
  2. Create g1.xml, g2.xml and index.html with following contents in pubsub-dashboard app.
  3. Go to http://localhost:9763/pubsub-dashboard.
  4. You will see g1 is publishing messages while g2 is receiving.
  5. If you click on the "Clear" button, then the log at g2 will be cleared.
g1.xml
<?xml version="1.0" encoding="UTF-8" ?>
<Module>
    <ModulePrefs title="G1" height="350" description="g1">
        <Require feature="pubsub-2"/>
        <Require feature="dynamic-height"/>
    </ModulePrefs>
    <Content type="html">
        <![CDATA[
        <head>
            <style type="text/css">
                .log {
                    width: 400px;
                    height: 400px;
                    background-color: #415b76;
                    color: #fff;
                }
            </style>
            <script language="javascript" type="text/javascript" src="/portal/js/flot/jquery.js"></script>
            <script>
                gadgets.HubSettings.onConnect = function() {
                    var id = 0;
                    setInterval(function() {
                        $('.log').append('<div>publishing message from g1, id : ' + (++id) + '</div>');
                        gadgets.Hub.publish('org.wso2.ues.samples.ch', {
                            msg : 'A message from g1',
                            id: id
                        });
                    }, 2000);
                };
            </script>
        <head>
        <body>
            <div class="log"></div>
        </body>
        ]]>
    </Content>
</Module>

g2.xml
<?xml version="1.0" encoding="UTF-8" ?>
<Module>
    <ModulePrefs title="G2" height="350" description="g2">
        <Require feature="pubsub-2">
            <Param name="topics">
                <![CDATA[
                <Topic title="geodata"
                    name="org.wso2.ues.samples.ch"
                    description="sample channel to demonstrate intergadget communication"
                    type="object"
                    subscribe="true"/>
               ]]>
            </Param>
        </Require>
        <Require feature="dynamic-height"/>
    </ModulePrefs>
    <Content type="html">
        <![CDATA[
        <head>
            <style type="text/css">
                .log {
                    width: 400px;
                    height: 400px;
                    background-color: #1abc9c;
                    color: #fff;
                }
            </style>
            <script language="javascript" type="text/javascript" src="/portal/js/flot/jquery.js"></script>
            <script>
                gadgets.HubSettings.onConnect = function() {
                    gadgets.Hub.subscribe('org.wso2.ues.samples.ch', function(topic, data, subscriberData) {
                        if(data.type === 'clear') {
                            $('.log').empty();
                            return;
                        }
                        $('.log').append('<div>message received, id: ' + data.id + '</div>');
                    });
                };
            </script>
        <head>
        <body>
            <div class="log"></div>
        </body>
        ]]>
    </Content>
</Module>

index.html
<!DOCTYPE html>
<html lang="en">
<head>
    <style type="text/css">
        #gadget-1, #gadget-2 {
            width: 500px;
            height: 400px;
            margin-bottom: 20px;
        }
    </style>
    <script language="javascript" type="text/javascript" src="/portal/js/flot/jquery.js"></script>
    <script src="/portal/themes/portal/js/shindig.js"></script>
    <script src="/portal/themes/portal/js/UESContainer.js"></script>
</head>
<body>
<div>
    <button class="clear" type="button">Clear</button>
</div>
<h4>g1</h4>
<div id="gadget-1"></div>
<h4>g2</h4>
<div id="gadget-2"></div>
<script>
    UESContainer.renderGadget('gadget-1', 'http://localhost:9763/pubsub-dashboard/g1.xml');
    UESContainer.renderGadget('gadget-2', 'http://localhost:9763/pubsub-dashboard/g2.xml');

    $(function () {
        $('.clear').click(function () {
            UESContainer.inlineClient.publish('org.wso2.ues.samples.ch', {
                msg: 'publishing message from dashboard',
                type: 'clear'
            });
        });
    });
</script>
</body>
</html>

Wednesday, February 26, 2014

Embedding gadgets in WSO2 User Engagement Server

WSO2 User Engagement Server aims towards creating any of your complex dashboards very easily. It has a build-in dashboard designer where you can create dynamic layouts and embed gadgets.

But in case you have a requirement of doing it manually, the following code will help you to get started. Put following code as an HTML/Jag file in UES and access through HTTP.
<!DOCTYPE html>
<html lang="en">
<head>
    <script src="/portal/themes/portal/js/shindig.js"></script>
    <script src="/portal/themes/portal/js/UESContainer.js"></script>
    <style type="text/css">
        #gadget-1, #gadget-2, #gadget-3 {
            width: 500px;
            height: 400px;
        }
    </style>
</head>
<body>
<div id="gadget-1"></div>
<div id="gadget-2"></div>
<!-- Embedding gadget via url -->
<iframe id="gadget-3"
        src="http://localhost:9763/gadgets/ifr?url=http://localhost:9763/portal/gadgets/pie-chart/pie-chart.xml">
</iframe>
<script>
    //UES gadget
    UESContainer.renderGadget('gadget-1', 'http://localhost:9763/portal/gadgets/bar-chart/bar-chart.xml');
    //External gadget
    UESContainer.renderGadget('gadget-2', 'http://hosting.gmodules.com/ig/gadgets/file/103035663984448200053/Google_Currency_Converter.xml');
</script>
</body>
</html>

Monday, February 10, 2014

What caramel is really

For anyone who doesn't know the context of the subject, it is not about the caramel that you taste, it is about a framework developed to write web application using a Jaggery server. Again, if you are not aware of Jaggery, it is a server side JavaScript runtime where you can write your whole web application using JavaScript.

In WSO2, we initiated this new server runtime named Jaggery to take the advantage of JavaScript expertise to write the backend of a web application as well. In today’s web pages, JavaScript can be seen everywhere. Hence, we wanted to take it to the server side, making JavaScript everywhere in the server side as well.

Yes, we made it. Thanks to Jaggery, now JavaScript is everywhere in the server side too. You neither need to learn a completely different language nor to earn a higher skill set to write your web applications. If you know HTML, CSS and JavaScript, then you are ready to go. You can straightaway start writing your whole web application.

We started developing our web apps. Like the frontend JavaScript codes, our server side code base too grew up day by day. Just a single developer couldn't handle it anymore. Many developers engaged on app developments. There were many repeating UI elements with same HTML, CSS and JavaScript. People started duplicating same thing here and there making it very very hard to maintain.

Hence, we tried to come up with a solution for immediate problems that we had. i.e.

  • Reducing UI code duplication
  • Multiple theme support
  • Dynamic theme switching based on tenant etc.
  • Theme customizing and extending

We initially came up with something based on Drupal's UI block concept, multiple theme support and later improved to suit our requirements and Jaggery runtime.

In Jaggery, all requests end up in *.jag files(Note: There is an ongoing development which improve this model by making it more extensible). It goes through url mappings that you defined in jaggery.conf and reaches a *.jag file at the end. In initial caramel version, we didn't want to change that routing mechanism and our only concern was about theming our data. Routing mechanism was out of the scope from initial caramel version and users were allowed go with their preferences.

caramel introduces multiple themes support where you can switch them dynamically for the request, based on your logic. i.e. Either admin users or tenants might have a completely different theme of their preference. With caramel core, we tries to minimize the conventions/restrictions it imposes on your apps. All you need to do is, passing the data that need to be themed into caramel.render() method from whatever the page you need. After that caramel flow gets the theme for that specific request and allow the theme to render as it wants. 

A theme, can decide either to send the data as a JSON or generate HTML from that data and send. Simply, the theme has complete control over what user sees or receives for that request. For the same application, you can define multiple themes based on different templating languages. e.g. One theme based on Handlebars, one theme based on Dustjs etc. or a theme without any templating language at all. This nature allows any developer to re-theme the whole caramel app using his own templating preferences, without touching anything of the web application code.

As I mentioned earlier, caramel core hands everything over to the selected theme and themes have the freedom of rendering those data. For our apps, the templating framework we selected is Handlebars. Hence, we came up with a Handlebars theme engine for caramel core, which enforces a well defined structure for our themes, reuses repeating UI elements across each page etc. 

As an example, in one of our web applications, we wanted to include a tag cloud in each page. We could have easily done it with just a Handlebars partial and include it wherever it needs. But that is not the case, tag cloud is not just the HTML, it contains its own CSS and optionally JavaScript codes as well. We will have to always make sure that, those are also included along with tag cloud. Whenever we fix something in the tag cloud, we will have to make sure it is reflected in each place. Hence, we tried to address this aspect through Handlebars engine by virtually grouping HTML, CSS, JavaScript together. i.e. When the tag cloud is added into a page, Handlebars engine will automatically add the relevant CSS and JavaScript too into that page.

That’s a brief information, but not everything about the Handlebars engine that I mentioned here and there. Anyway, if anyone is not happy with the Handlebars engine that we have, they can always write their own engines and themes for the same app, neither modifying existing themes nor web application source.

Let’s say someone wanted to do several minor modifications to one of the existing themes. Then he will have to write a completely new theme with those changes. Fortunately, with caramel, you can create a sub theme with an existing theme. Whatever the files you need to override, can be placed in your sub theme. caramel will first try to load any file from your sub theme and then from the parent theme. With this model, one can customize an existing theme up to some extent even without touching it at all.

I hope, above would be enough for you to understand what and why caramel is. We developed caramel with the experiences and the ideas we had, which neither mean it is right nor the best. Probably you might have better suggestions and experiences. Hence, please contribute your ideas and improvements back to fix what is wrong and what is missing.

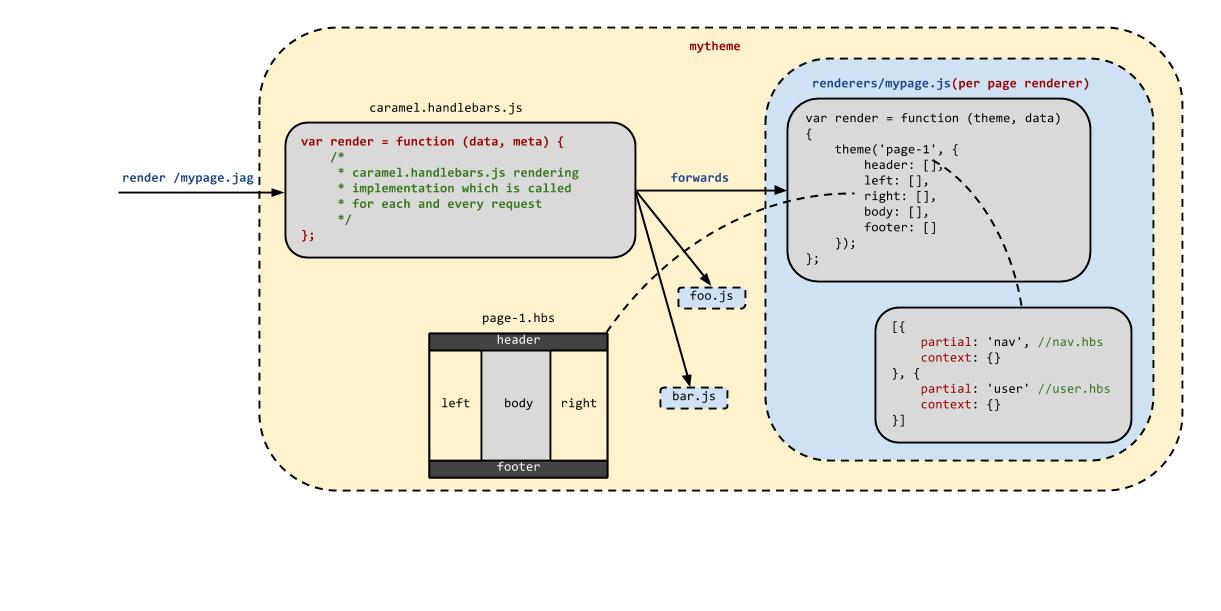
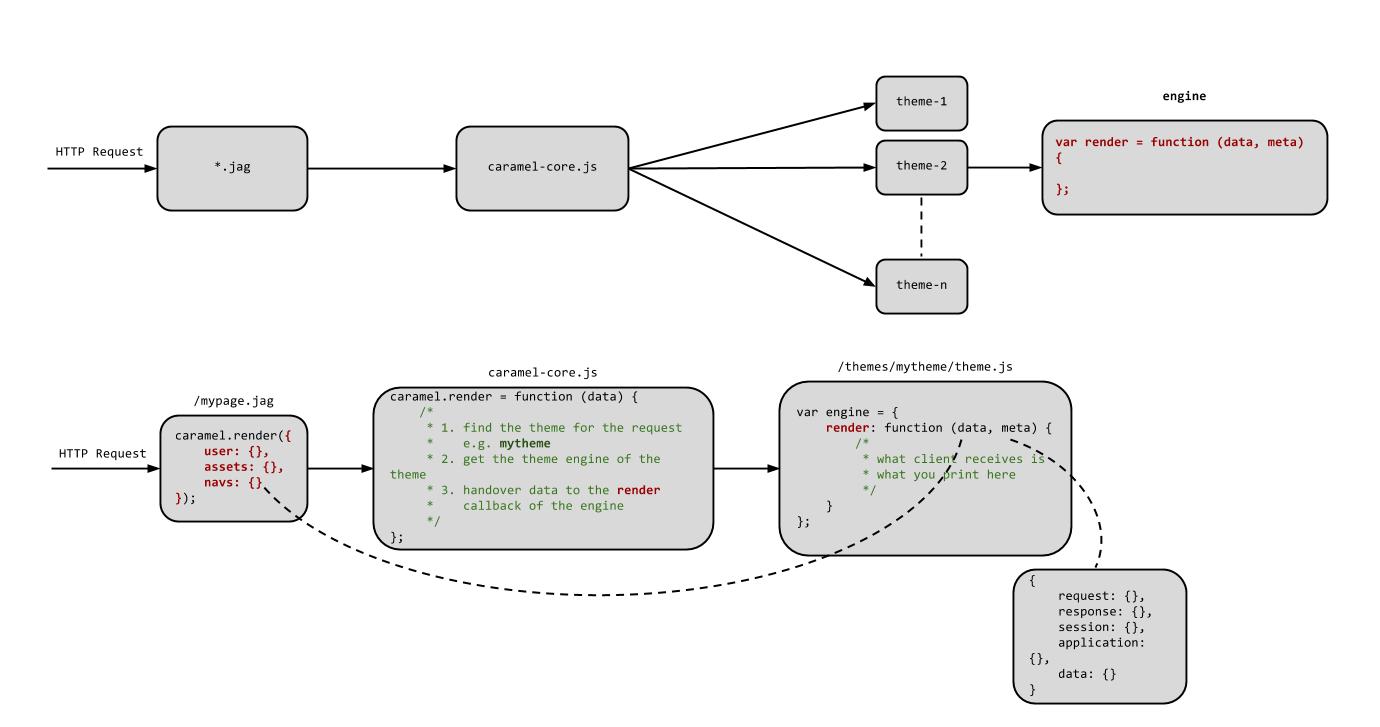
You can find the caramel source at [2] and a sample application at [3]. Diagrams at [4] and [5] will help you to understand caramel core and Handlebars engine respectively. 

[1] http://jaggeryjs.org
[2] https://github.com/wso2/caramel
[3] https://github.com/ruchiraw/wso2-samples-store
[4] https://raw.github.com/ruchiraw/wso2-samples-store/master/docs/caramel-core.jpg
[5] https://raw.github.com/ruchiraw/wso2-samples-store/master/docs/caramel.handlebars.jpg

Friday, April 12, 2013

Creating CSV Files from a Proxy Service

If you want to write a CSV file from a proxy service in WSO2 ESB, then following sample would help you to understand how it works.

  1. Uncomment the following lines in wso2esb-4.x.x/repository/conf/axis2/axis2.xml.
    <transportreceiver class="org.apache.synapse.transport.vfs.VFSTransportListener" name="vfs"/>
    <transportsender class="org.apache.synapse.transport.vfs.VFSTransportSender" name="vfs"/>
  2. Add below content into the resource called /_system/governance/xml2csv.xslt
    <xsl:stylesheet version="1.0" xmlns:xsl="http://www.w3.org/1999/XSL/Transform">
    <xsl:output method="text" encoding="iso-8859-1"/>
    
    <xsl:strip-space elements="*" />
    
    <xsl:template match="/*/child::*">
     <xsl:for-each select="child::*">
      <xsl:if test="position() != last()"><xsl:value-of select="normalize-space(.)"/>,</xsl:if>
      <xsl:if test="position()  = last()"><xsl:value-of select="normalize-space(.)"/><xsl:text>
    </xsl:text></xsl:if>
     </xsl:for-each>
    </xsl:template>
    
    </xsl:stylesheet>
    
  3. Create a proxy service named CSVProxy with the following content.
    <proxy xmlns="http://ws.apache.org/ns/synapse" name="CSVProxy" transports="https,http" 
        statistics="disable" trace="disable" startOnLoad="true">
       <target>
          <inSequence>
             <property name="FORCE_SC_ACCEPTED" value="true" scope="axis2"/>
             <payloadFactory>
                <format>
                   <data>
                      <row>
                         <firstName>Ruchira</firstName>
                         <lastName>Wageesha</lastName>
                      </row>
                      <row>
                         <month>May</month>
                         <date>31</date>
                         <year>1984</year>
                      </row>
                      <row>
                         <street>Flower Road</street>
                         <province>Western</province>
                         <city>Colombo</city>
                         <country>Sri Lanka</country>
                         <postalCode>0007</postalCode>
                      </row>
                   </data>
                </format>
             </payloadFactory>
             <xslt key="gov:/xml2csv.xslt"/>
             <property name="transport.vfs.ReplyFileName" expression="fn:concat(fn:substring-after(get-property('MessageID'), 'urn:uuid:'), '.csv')" scope="transport"/>
             <property name="OUT_ONLY" value="true"/>
             <send>
                <endpoint>
                   <address uri="vfs:file:///home/ruchira/csv"/>
                </endpoint>
             </send>
             <drop/>
          </inSequence>
       </target>
    </proxy>                               
    
    Note : vfs:file:///home/ruchira/csv is the path where generated csv files are stored. Hence replace it with a valid path in your machine.
  4. Invoke the CSVProxy service by issuing an HTTP GET to http://localhost:8280/services/CSVProxy
  5. CSV files will be created in the above specified path.

Thursday, April 11, 2013

Sending JSON Responses from a Proxy Service in WSO2 ESB

If you have come up with the requirement of sending JSON responses from a proxy service, then following proxy configuration can be used straightaway to try that out.

i.e. Create a proxy service named JSONProxy with the following content. Then, you can try that out by issuing HTTP GET to http://localhost:8280/services/JSONProxy

Proxy Configuration
<proxy xmlns="http://ws.apache.org/ns/synapse" name="JSONProxy" transports="https,http" 
       statistics="disable" trace="disable" startOnLoad="true"> 
   <target> 
      <inSequence> 
         <header name="To" action="remove"/> 
         <property name="RESPONSE" value="true"/> 
         <property name="NO_ENTITY_BODY" scope="axis2" action="remove"/> 
         <payloadFactory> 
            <format> 
               <person> 
                  <fullName> 
                     <firstName>Ruchira</firstName> 
                     <lastName>Wageesha</lastName> 
                  </fullName> 
                  <birthDate> 
                     <month>May</month> 
                     <date>31</date> 
                     <year>1984</year> 
                  </birthDate> 
                  <address> 
                     <street>Flower Road</street> 
                     <province>Western</province> 
                     <city>Colombo</city> 
                     <country>Sri Lanka</country> 
                     <postalCode>0007</postalCode> 
                  </address> 
               </person> 
            </format> 
         </payloadFactory> 
         <property name="messageType" value="application/json" scope="axis2"/> 
         <send/> 
      </inSequence> 
   </target> 
   <description></description> 
</proxy>
JSON Response
{
    "person": {
        "fullName": {
            "firstName": "Ruchira",
            "lastName": "Wageesha"
        },
        "birthDate": {
            "month": "May",
            "date": "31",
            "year": "1984"
        },
        "address": {
            "street": "Flower Road",
            "province": "Western",
            "city": "Colombo",
            "country": "Sri Lanka",
            "postalCode": "0007"
        }
    }
}

Wednesday, April 3, 2013

Error Handling in Jaggery

Proper error handling is a key points in any application. If you are using WSO2 Jaggery, then you might have also come up with the same requirement.

Jaggery is JavaScript, hence try, catch and finally blocks can be used within your code as you usual. Also,  passed JavaScript Error object can be used to get a brief information about the error. But, as we are dealing with a server side environment, we might need to know additional details about the errors, such as stacktrace, line numbers etc.

Using the additional properties/methods which can be found in the passed Error object, error details can be accessed as below.
var log = new Log();

try {
    parse(null); //code where exception is thrown
} catch (e) {
    log.error(e.lineNumber); // Error occured line number
    log.error(e.fileName); // Error occured script name
    log.error(e.stack); // Executed JavaScript file stack
    log.error(e.message); // JavaScript error message

    log.error(e.rhinoException); // Rhino exception object
    log.error(e.javaException); // Java excepton object

    log.error(e); // Logs the stack trace

    print(e); // prints the stack trace
} finally {
    log.info('finally :)');
}


Thursday, March 14, 2013

Logging in Jaggery

In Jaggery, you can log with different levels i.e. debug, info, warn, error, fatal which can be enabled/disabled using the logLevel parameter in the jaggery.conf.
{
    "welcomeFiles" : ["index.html"],
    "logLevel" : "debug"
} 

Logging can be done with the desired log level using log.debug(), log.info(), log.warn(), log.error() and log.fatal() methods. Also, whether the debug logs are enabled can be checked using log.isDebugEnabled().
var log = new Log();

if(log.isDebugEnabled()) {
    log.debug('This is a debug log');
}

log.info('This is an info log');
log.warn('This is a warning log');
log.error('This is an error log');
log.fatal('This is a fatal log');

Get Environment Variables and System Properties in Jaggery

Environment variables and system properties can be read using the process module as below.
var process = require('process');

print(process.getEnvs()); // json object
print(process.getEnv('PATH')); // string
print(process.getProperties()); // json object
print(process.getProperty('jaggery.home')); // string

How to Generate a UUID in Jaggery

A UUID can be generated in WSO2 Jaggery server using the uuid module as below.
var uuid = require('uuid');
var id = new uuid.UUID();

print(id.toString()); // 0af9cb30-f660-4d5c-8d39-28cf87c7e574

How to Execute Tasks in WSO2 Jaggery

If you have come across the requirement of executing timer tasks within a Jaggery code, then you can use the following code to do that. These are the same set of functions that you have in the browser.

You can also use clearTimeout and clearInterval functions to stop the task execution.

One time tasks
setTimeout(function() {
     var log = new Log();
     log.info('setTimeout() is executed after 2s');
}, 2000);  
Recurring tasks
setInterval(function() {
     var log = new Log();
     log.info('setInterval() is being executed within 4s intervals');
}, 4000);

Wednesday, January 30, 2013

Check your A/L Exam Results a Bit Earlier

If you have sat for the A/L exam in Sri Lanka, you can check your unofficial results a bit earlier(when it shows you the "AWAIT RESULTS" banner) by accessing the following url from your browser(Please replaces 0000000 with your index number).

http://www.doenets.lk/exam/exam_AL.jsp?submit=Submit&action=result&exyear=2012&indexno=0000000

Tuesday, October 30, 2012

WSO2 Ant Application Deployer

Note :  You would be able to achieve most the requirements described here using puppet scripts, which would be the ideal way of doing it. Anyway, if you are still interested, you can continue reading.

Ant application deployer is a custom deployer written to deploy an Ant script in a WSO2 Carbon based server, which will then get executed automatically. Using Ant deployer, you can deploy any artifact/jar/configuration into a carbon server using a single file.

Along with the Ant deployer, following custom tasks are also included.
  1. server
    • This can be used to shutdown/restart a local/remote Carbon Server
  2. registry
    • This can be used to insert metadata into a local/remote registry of a WSO2 server
Note : Ant application deployer should be used if and only if, Ant applications are deployed by trusted parties. Also, this shouldn't be used in a cloud environment.

Why Ant application deployer


Lets assume you have a requirement to configure an WSO2 ESB server as below.
  1. Install a set of custom mediators
  2. Deploy a set of carbon applications with sequences/registry resources which uses those custom mediators
  3. Deploy APIs and templates which cannot be included in car file at the moment
  4. Add metadata like properties, associations along with the registry resources.
Notes :  Support for APIs and templates would be added in the future, but at the moment it is not supported.

If you want to do above configurations, then you might need to follow below steps.
  1. Copy jar files
  2. Restart the server
  3. Copy carbon applications
  4. Copy APIs and templates
  5. Manually add metadata
But, using Ant deployer with its custom tasks mentioned above, you can create a single deployable artifact which does everything mentioned above using ant. Only step that you will need to do is, just to copy the all in one zip file into the relevant location. Then the Ant script in the zip file will be automatically executed and above steps would be executed.

Although above is a simple usecase, you would be able to do more cool stuff such as to configure/patch/migrate a whole carbon installation with a proper ant script.


Installation

  1. Copy the jar named org.wso2.carbon.extensions.antdeployer-1.0.0.jar into repository/components/dropins directory of the carbon 4.0.x based server.
  2. Restart the server

Using Ant Deployer


Properties


Following properties can be used within the Ant script to get the information about the server being runing.

Property Example Value
carbon.home /home/ruchira/wso2esb-4.5.0
carbon.conf /home/ruchira/wso2esb-4.5.0/repository/conf
carbon.logs /home/ruchira/wso2esb-4.5.0/repository/logs
carbon.dropins /home/ruchira/wso2esb-4.5.0/repository/components/dropins
carbon.lib /home/ruchira/wso2esb-4.5.0/repository/components/libs
carbon.repo /home/ruchira/wso2esb-4.5.0/repository/deployment/server/
carbon.tenants /home/ruchira/wso2esb-4.5.0/repository/tenants
carbon.components /home/ruchira/wso2esb-4.5.0/repository/components/plugins
carbon.tmp /home/ruchira/wso2esb-4.5.0/tmp
carbon.catalina /home/ruchira/wso2esb-4.5.0/lib/tomcat/work/Catalina

Custom Ant Tasks


server

This Ant task can be used to restart/shutdown a local/remote carbon server.
<server
        url="https://serverhost:port/services"
        username="user"
        password="pass"
        action="restart|shutdown|gracerestart|graceshutdown"
        target="t1"/>
For the action, you need to specify one of the followings
  1. shutdown
    • Discard any requests currently being processed and immediately shutdown the server.
  2. restart
    • Discard any requests currently being processed and immediately restart the server.
  3. graceshutdown
    • Stop accepting new requests, continue to process already received requests, and then shutdown the server.
  4. gracerestart
    • Stop accepting new requests, continue to process already received requests, and then restart the server.

Shutdown/restart different server
<server
        url="https://serverhost:port/services"
        username="user"
        password="pass"
        action="restart|shutdown|gracerestart|graceshutdown"/>

Shutdown/restart same server
<server target="t1" action="restart|shutdown|gracerestart|graceshutdown"/>
When the same server is being restarted/shutdown, then everything that you need to execute after restart/shutdown, should be defined as a separate task/tasks and specify first task with "target" attribute.

If the server is just shutdown, then "target" attribute can be omitted.  But if you have specified a “target” attribute even for shutdown action, then that target will be executed whenever the server is being restarted.

registry

Registry metadata can be added by specifying  the paths to metadata files as below.
<registry password="pass" url="https://serverhost:port/registry" username="user">
    <metadata path="registry-meta/meta1.xml"/>
    <metadata path="registry-meta/meta2.xml"/>
</registry>
Further, if the metadata is added to the resources which are being deployed by the *.car files in the same Ant application, then there is a possibility of executing metadata task before the resources get added to the registry.

As a solution for this, registry Ant task waits and retries several times until resources get deployed.  Default value for wait is 10s and retry count is 5.

Anyway, these wait and retry times can be overridden by specifying following properties in the build.xml.
<property name="registry.retries" value="4"/>
<property name="registry.sleep" value="20000"/>

Using your own custom tasks

If any additional custom tasks are required depending on your environment, those jars can be added either into repository/components/dropins (OSGI bundles) or repository/components/lib (Non-OSGI jars).

Then, above custom tasks can be used in your ant scripts as below by defining the task class in every script.
<target name="use" description="Use the Task" depends="jar">
    <taskdef name="helloworld" classname="com.mycompany.HelloWorld"/>
    <helloworld/>
</target>
Adding task definitions in each script can be avoided by defining them in repository/conf/ant-deployer.xml as below.
<AntDeployer xmlns="http://wso2.org/carbon/antdeployer">
    <Tasks>
        <Task name="helloworld" classname="com.mycompany.HelloWorld"/>
        <Task name="hellouniverse" classname="com.mycompany.HelloUniverse"/>
    </Tasks>
</AntDeployer>
Then, tasks can be used directly without defining them in the scripts.

Metadata Configuration

Adding metadata

Following is an example metadata file. When there are multi-valued properties, “append” attribute need to be specified.
<metadata xmlns="http://wso2.org/carbon/registry/metadata">
    <resource path="/_system/config/resource1">
        <associations>
            <association path="/_system/governance/resource2"
                         type="depends"/>
            <association path="/_system/governance/resource3"
                         type="depends"/>
        </associations>
        <properties>
            <property name="p1" append=”true”>v1</property>
            <property name="p2">v2</property>
        </properties>
        <tags>
            <tag>t1</tag>
            <tag>t2</tag>
        </tags>
    </resource>
</metadata>

Removing resources/metadata from Registry

By defining an attribute named “remove” within each resource, association, property and tag elements,  you can instruct to remove those resources/metadata from the registry.
<metadata xmlns="http://wso2.org/carbon/registry/metadata">
    <resource path="/_system/config/resource1" remove="true"/>
    <resource path="/_system/config/resource2">
        <associations>
            <association path="/_system/governance/resource3"
                         type="depends" remove="true"/>
        </associations>
        <properties>
            <property name="p1" append=”true” remove="true">v1</property>
            <property name="p2" remove="true"/>
        </properties>
        <tags>
            <tag remove="true"/>
        </tags>
    </resource>
</metadata>

Trying it out


The source code, the pre-build jar and a sample Ant application written for WSO2 ESB server can be found at [1]. This sample Ant application will do the following steps.
  1. Copying the mysql driver
  2. Restarting the server
  3. Deploying ESB sequence template named template1
  4. Deploying ESB API named api1
  5. Deploying the carbon application named sample-antapp_1.0.0.car which includes
    • A proxy service named SampleProxy
    • Registry resources named endpoint1.xml and endpoint2.xml which will be deployed at /_system/antapp-sample/endpoints
  6. Creating a set of associations between /_system/antapp-sample and above endpoint1.xml, endpoint2.xml resources
  7. Adding a set properties named p1, p2 etc. and tags named t1, t2 etc into the collection /_system/antapp-sample and endpoint1.xml, endpoint2.xml resources

In order to try it out,
  1. Install the Ant deployer into WSO2 ESB 4.5.0 server following the above installation steps
    • Pre-built jar can be found in lib directory at [1]
  2. Create a directory at <cabon_home>/repository/deployment/server/antapps
    • e.g. wso2esb-4.5.0/repository/deployment/server/antapps
  3. Copy the sample-antapp.zip file into the antapps directory
    • Pre-build antapp can be found in lib directory at [1]
  4. Restarting logs should be able to notice either in the console or  server logs within a few seconds

Resources

[1] https://svn.wso2.org/repos/wso2/people/ruchira/ant-deployer
[2] build.xml in the sample antapp
<?xml version="1.0" encoding="ISO-8859-1"?>
<project name="sample-antapp" basedir="." default="t0">
    <target name="t0" description="Copy jars into Carbon Server and restart">
        <copy file="jars/mysql-connector-java-5.1.22-bin.jar"
              todir="${carbon.lib}"/>
        <server target="t1"/>
    </target>
    <target name="t1" description="Copy artifacts">
        <copy file="templates/template1.xml"
              todir="${carbon.repo}/synapse-configs/default/templates"/>
        <copy file="apis/api1.xml"
              todir="${carbon.repo}/synapse-configs/default/api"/>
        <copy file="carbonapps/sample-antapp_1.0.0.car"
              todir="${carbon.home}/repository/carbonapps/0"/>
        <registry url="https://localhost:9443/registry"
                  username="admin" password="admin">
            <metadata path="registry-meta/*"/>
        </registry>
    </target>
    <target name="t2" description="Create ruchira directory">
        <mkdir dir="${carbon.home}/ruchira"/>
    </target>
</project>
[3]  Registy metadata xml in the sample antapp
<metadata xmlns="http://wso2.org/carbon/registry/metadata">
    <resource path="/_system/antapp-sample">
        <associations>
            <association path="/_system/antapp-sample/endpoints/endpoint1.xml"
                         type="depends"/>
            <association path="/_system/antapp-sample/endpoints/endpoint2.xml"
                         type="depends"/>
        </associations>
        <properties>
            <property name="p1">v1</property>
            <property name="p2">v2</property>
        </properties>
        <tags>
            <tag>t1</tag>
            <tag>t2</tag>
        </tags>
    </resource>
    <resource path="/_system/antapp-sample/endpoints/endpoint1.xml">
        <associations>
            <association path="/_system/antapp-sample/endpoints/endpoint2.xml"
                         type="sibling"/>
        </associations>
        <properties>
            <property name="p1">e1v1</property>
            <property name="p2">e1v2</property>
        </properties>
        <tags>
            <tag>e1t1</tag>
            <tag>e1t2</tag>
        </tags>
    </resource>
    <resource path="/_system/antapp-sample/endpoints/endpoint2.xml">
        <associations>
            <association path="/_system/antapp-sample/endpoints/endpoint1.xml"
                         type="sibling"/>
        </associations>
        <properties>
            <property name="p1">e2v1</property>
            <property name="p2">e2v2</property>
        </properties>
        <tags>
            <tag>e2t1</tag>
            <tag>e2t2</tag>
        </tags>
    </resource>
</metadata>

Wednesday, October 3, 2012

How to Specify Default Message Builder and Message Formatter in Axis2

By default Axis2 message builders and formatters are registered against a content type. But there might be situations that you might need to specify a default message builder/formatter in Axis2.

This can be achieved by specifying a regular expression as the contentType. Then, Axis2 will first try to find a matching message builder/formatter for your content type and when it couldn't find a match, it will try to match against the regular expressions which we have specified.

Using this functionality, you can either register a default builder/formatter or one builder/formatter pair for a set of content types which matches to the given regular expression.

Further, if you are using binary relay feature of WSO2 ESB or WSO2 ELB(Elasting Load Balancer), then you will feel the ease of using regular expressions to specify BinaryRelayBuilder and ExpandingMessageFormatter.
<messageBuilder contentType=".*" class="org.wso2.carbon.relay.BinaryRelayBuilder"/>

<messageFormatter contentType=".*" class="org.wso2.carbon.relay.ExpandingMessageFormatter"/>

Thursday, July 5, 2012

WSO2 ESB - Error Codes

Following is the list of error codes used in WSO2 ESB and a brief description about them.

Code Description
101000 Receiver IO error sending
101001 Receiver IO error receiving
101500 Sender IO error sending
101501 Sender IO error receiving
101503 Connection failed
101504 Connection timed out
101505 Connection closed
101506 HTTP protocol violation
101507 Connect cancel
101508 Connect timeout
101509 Send abort

Error Handling in WSO2 ESB

When a Proxy Service or a Sequence which mediate messages, is considered, error handling would be a key concern. Depending on the error type, we might need to send a fault message, custom response etc.

WSO2 ESB makes our life easier by allowing us to specify a custom fault sequence for error handling. i.e. It gives the flexibility to use mediator and do various tasks even when an error occurred.

Following is a sample sequence which logs the error details and sends a custom message to the client when an error occurs. Further, if you need to send a SOAP Fault, then Fault mediator can be used instead of Payload Factory mediator.
<sequence name="myErrorSequence">
    <header name="To" action="remove"/>
    <property name="RESPONSE" value="true"/>
    <property name="NO_ENTITY_BODY" scope="axis2" action="remove"/>

    <log level="custom">
        <property name="error-message" expression="get-property('ERROR_MESSAGE')"/>
        <property name="error-code" expression="get-property('ERROR_CODE')"/>
        <property name="error-detail" expression="get-property('ERROR_DETAIL')"/>
        <property name="error-exception" expression="get-property('ERROR_EXCEPTION')"/>
    </log>

    <payloadFactory>
        <format>
            <ns:MyResponse xmlns:ns="http://services.samples">
                <ns:Error/>
            </ns:MyResponse>
        </format>
    </payloadFactory>
    <send/>
</sequence> 

As response might be sending even without going to the outSequence, we need to remove the To header and specify the other two properties named RESPONSE and NO_ENTITY_BODY.

You can also get the details of the error occurred using properties named ERROR_MESSAGE, ERROR_CODE, ERROR_DETAIL and ERROR_EXCEPTION.

After you added the above sequence into the configuration, you can refer it as below from a Proxy or a Sequence.

For a Sequence :
<sequence name="mySequence" onerror="myErrorSequence">
.......
</sequence>
For a Proxy Service :
<proxy name="MyProxy" xmlns="http://ws.apache.org/ns/synapse">
    <target faultSequence="myErrorSequence">
    ......
    </target>
</proxy>

Wednesday, July 4, 2012

Enable Wire Level Logs in WSO2 ESB

When you work with WSO2 ESB, you might need to monitor the wire level data which go through the server. Then, you can simply do that by adding the following entry into the log4j.properties file which can be found at lib/log4j.properties

log4j.category.org.apache.synapse.transport.nhttp.wire=DEBUG

Fixing REST URLs in Send Mediator of WSO2 ESB

There might be situations, that you would need to do REST calls using the send mediator of WSO2 ESB. Then, you might have noticed the endpoint url that you specified in the endpoint configuration, gets suffixed by a url fragment.

This happens when ever you do a REST call using the send mediator. In order to get rid of it, please specify the following property before the send mediator.
<property name="REST_URL_POSTFIX" scope="axis2" action="remove"/>

Sending a Dummy Response from WSO2 ESB

When you play with WSO2 ESB, you might need to send some dummy data as the response of a proxy service or an REST API. In order to do that you will need to specify To, RESPONSE and NO_ENTITY_BODY properties in the inSequence. If the sequence doesn't get called via an HTTP GET, then the property NO_ENTITY_BODY can be removed from the sequence.

Then, the sequence will directly send the response to the client even without going through the outSequence. Using either Enrich or Payload Factory mediator, you can create the response massage manually.

Following is a sample inSequence.
<inSequence>
    <header name="To" action="remove"/>
    <property name="RESPONSE" value="true"/>
    <property name="NO_ENTITY_BODY" scope="axis2" action="remove"/>
    <payloadFactory>
        <format>
            <ns:getQuoteResponse xmlns:ns="http://services.samples">
                <ns:return xmlns:ax21="http://services.samples/xsd">
                    <ax21:change>4.212070096051944</ax21:change>
                    <ax21:earnings>-9.567415587431361</ax21:earnings>
                    <ax21:high>-148.1740146577308</ax21:high>
                    <ax21:symbol>IBM</ax21:symbol>
                </ns:return>
            </ns:getQuoteResponse>
        </format>
    </payloadFactory>
    <send/>
</inSequence>